Taller Virtual de Meteorología y Clima.
Contaminación Atmosférica - Inversión térmica
- ¡De qué va esto!
- Vamos a verlo
- ¿Cómo hacerlo?
- ¿Y en mi casa?
- English version
Aunque la temperatura del aire depende del lugar y del momento (por ejemplo, lo próxim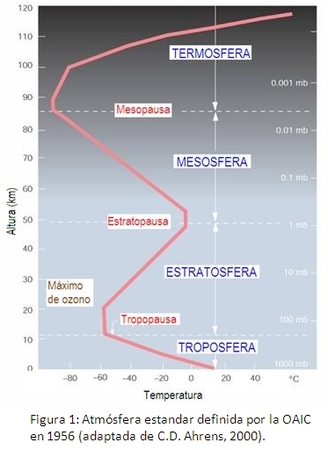 o o distante que esté el lugar respecto al ecuador, su cercanía o lejanía de la costa, estación del año, hora del día, etc...), en promedio global -espacial y temporal-, la temperatura del aire disminuye con la altura en los primeros kilómetros de la atmósfera. Por ello, el término “inversión térmica” indica un comportamiento contrario en la variación vertical habitual de la temperatura, es decir, un aumento térmico con la altura.
En la Figura 1 se muestra la distribución vertical de la temperatura en la llamada “atmósfera estándar”, definida originalmente por la Organización de Aviación Civil Internacional (OACI) en 1956 a partir de medidas climatológicas de lugares de todo el planeta. De acuerdo con esta atmósfera patrón, la temperatura desciende 6.5 ºC por cada kilómetro en los primeros 11 km. Tal comportamiento promedio es debido a que esta región atmosférica se calienta fundamentalmente por convección del calor liberado desde la superficie terrestre, cuya temperatura se debe básicamente a la absorción de radiación solar (y en menor medida también de radiación infrarroja emitida desde la propia atmósfera). Por ello, cuanto más alejadas están las capas de aire de la superficie terrestre menos calor reciben de ésta. No obstante, en ciertas regiones atmosféricas la temperatura aumenta con la altura, siendo esto debido a la absorción de radiación solar ultravioleta por ozono en la estratosfera (longitudes de onda entre 0.2 y 0.3 µm) o por nitrógeno y oxígeno en la termosfera (longitudes de onda inferiores a 0.2 µm).
Una capa de la atmósfera con inversión térmica no permite que se produzcan movimientos ascendentes de aire. Por tanto, son zonas de máxima estabilidad atmosférica, dado que el aire de la parte inferior es más frío, así que no asciende al ser más denso o pesado que el aire que está por encima. Consecuentemente, una inversión térmica próxima al suelo impide que los contaminantes producidos por las actividades humanas se dispersen verticalmente o se alejen de la superficie terrestre. Este hecho puede dar lugar a episodios de altos valores de contaminación del aire, con los consiguientes posibles efectos nocivos para la salud humana.
Las inversiones térmicas junto a la superficie terrestre ocurren frecuentemente en noches despejadas de invierno, en calma o con viento débiles, y sobre suelo continental. Estas circunstancias favorecen un enfriamiento muy acusado del suelo (inversiones térmicas de radiación o de superficie). El aire junto al suelo muy frío se enfría por contacto, mientras que el aire más alejado del suelo -al que no llega este efecto- resulta tener una temperatura más alta que el aire que está por debajo. Estas inversiones suelen desaparecer al día siguiente a medida que, tras la salida del Sol, el suelo vuelve a calentarse por absorción de radiación solar, y con ello también se calienta el aire junto al suelo. Este tipo de inversión suele observarse en regiones montañosas, en las que durante la noche el aire frío en superficie desciende por su mayor densidad desde las laderas al valle, favoreciendo con ello la presencia de aire más frío en superficie que el aire por encima de éste.
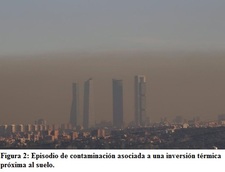
Por otra parte, fuertes situaciones anticiclónicas en un lugar también favorecen la ocurrencia de inversiones térmicas, pero en este caso no se forman junto a la superficie sino a una determinada altura (en general superior a 500 m). Dichas situaciones de alta presión tienen asociados movimientos descendentes de aire en su parte central, con unas características en su desarrollo que traen consigo el calentamiento de la masa de aire descendente. Esta, tras varios kilómetros de descenso, puede llegar a ser notablemente más cálida y seca que el aire que le rodea tanto por debajo como por encima. A este tipo de inversiones térmicas se les conoce como inversiones térmicas de subsidencia, y suelen cubrir grandes extensiones y ser bastante persistentes.
Otra circunstancia que da lugar a una inversión térmica es la llegada de un frente frío a un lugar (inversión térmica frontal), de tal modo que la masa de aire frío al invadir la región ocupada por aire más cálido, obliga a éste a ascender situándose por encima del aire frío.
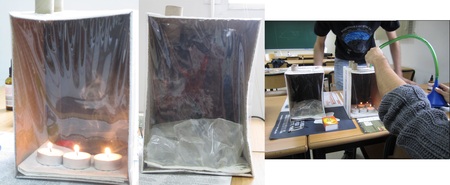
En este vídeo vamos a ver cómo se pueden simular dos situaciones opuestas que tienen lugar en la región atmosférica más próxima a la superficie terrestre. En primer lugar veremos una situación típica diurna en la que la temperatura del aire disminuye con la altura. A continuación trataremos una situación típica de noches despejadas, es decir, sin nubes, en la que la temperatura aumenta con la altura. Esta última situación se denomina inversión térmica.
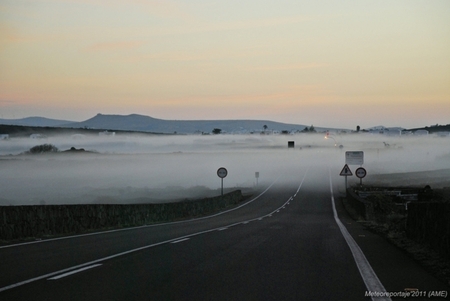
Fenómenos típicos asociados a las inversiones térmicas de radiación (llamadas también de superficie) son la formación de nieblas radiativas (imagen inferior) y la acumulación de contaminantes atmosféricos en las proximidades de la superficie terrestre.
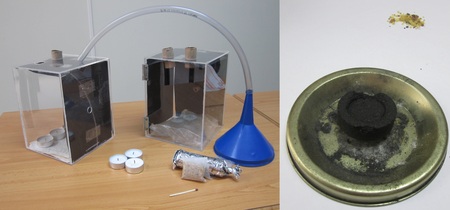
Material
Para realizar el experimento necesitamos:
- 2 cajas de metacrilato
- Cartulina negra
- Tubos de cartón a modo de chimenea
- Velas
- Bolsa de hielos
- Embudo y tubo
- Resina de incienso
- Carbón
- Cerillas
Generación de Humo
Para llevar a cabo nuestro experimento generamos humo, el cual va a simular una niebla o contaminantes en las proximidades del suelo. Simplemente usamos una pequeña pastilla de carbón que encendemos con cerillas. Y a continuación quemamos resina de incienso sobre el carbón para obtener el humo.
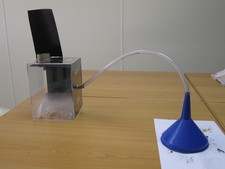
Así nos queda el montaje final
Una vez montado todo debe quedar como en la foto. Podemos observar cómo al generar el humo e introducirlo en la caja para simular la inversión térmica, el humo se acumula en la parte de abajo junto al hielo (frío).
Más profesional
Para hacer el experimento en casa se pueden construir las cajas cortando láminas de metacrilato, haciendo los agujeros para introducir el humo y para permitir que salga, y uniéndolas posteriormente.
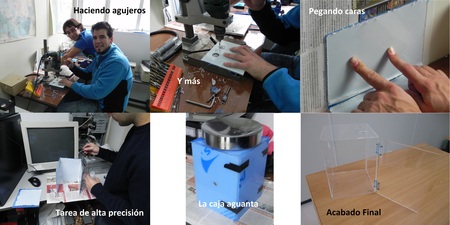
Comprar láminas de metacrilato para las caras de las cajas y hacer los orificios con un taladro. Unir las caras usando cloroformo o silicona y dejar que se seque bien. Poner un peso encima puede ayudar. Acabar poniendo unas bisagras para la puerta y la caja está preparada para el experimento. Se puede pegar cartulina negra en las caras de la caja que situemos al fondo de nuestra dirección de observación para así tener un mayor contraste con el humo, que es blanco.
Más sencillo
O bien, usar unas cajas de cartón más sencillas y económicas (en tiempos de crisis) pero igualmente funcionales.
Para hacerlas hay que coger una caja de cartón. En la parte de atrás estará la tapa para poder meter las velas y el hielo y por delante cortar una cara de la caja original y poner forro de plástico transparente para poder ver su interior. También hay que hacer unos agujeros, uno para introducir el humo y otros para que podamos poner las chimeneas de salida del mismo.
What is this all about?
Air temperature can significantly change from one to another location and time. It is sensitive to different factors, such as distance to the equator, proximity to the coast, season of the year or time of the day. Nevertheless, considering a global average -both temporal and spatial-, air temperature tends to diminish with height within the first few kilometres of the atmosphere. For this reason, the term "temperature inversion" indicates an opposite behaviour to the standard vertical variation of the temperature. That means an increase of the air temperature as we ascend.
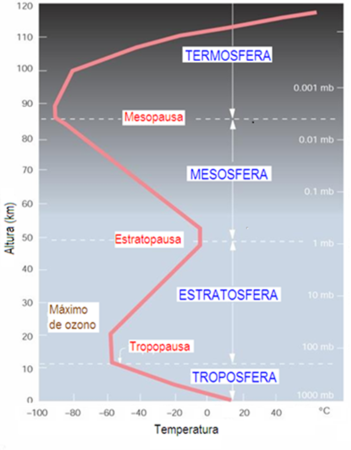
Figure 1. Variation of temperature with height according to a standard atmosphere
From climatological observations around the world, the International Civil Aviation Organization (ICAO) proposed a definition of the vertical variation of the air temperature in a "standard atmosphere" (Figure 1). According to this pattern, air temperature decreases at a rate of 6.5 ºC per kilometre within the first 11 km. Such an average behaviour occurs because this part of the atmosphere is basically heated due to convection associated to energy released by infrared radiation from the Earth's surface. For this reason, an atmospheric layer located farther from the ground would receive not as much heating than another one closer to the surface. However, in certain regions of the atmosphere the air temperature can increase as we go to upper levels due to the absorption of solar radiation (ultraviolet) by the stratospheric ozone (wavelength: 0.2-0.3 µm) or nitrogen and oxygen in the thermosphere (wavelength below 0.2 µm).An atmospheric layer with a temperature inversion inhibits the ascending vertical motion of air. Therefore, these are high atmospheric stability zones, considering that the air at the bottom is colder than at the upper part, so that it cannot reach higher levels due to its greater density and weight. Consequently, a thermal inversion close to the ground does not allow an easy vertical dispersion of contaminants coming from the human activities, remaining close to the ground and meaning a risk regarding health issues.
Surface-based temperature inversions frequently occur over the continents during clear nights, with weak or even no wind. These features favour a dramatic cooling of the ground (surface or radiative temperature inversions). In this case, the air adjacent to the Earth's very cold surface gets cooled through this contact. On the other hand, another layer of air which is at an upper level, high enough not to notice this effect, keeps a warmer temperature than the air just below. These temperature inversions are usually eroded during the coming morning: after sunrise, the ground receives again an input of solar energy and progressively gets warmer, and so does the air close to the ground. This kind of inversions is usually observed in steep terrain during the night, where cold air at surface may go slope down due to its greater density. This favours the presence of a colder air layer at surface than the air above.
Moreover, a strong anticyclonic situation can allow the occurrence of temperature inversions also far away of the ground. In this case, they are not surface-based, but at a certain level, usually higher than 500 m. These high pressure situations are linked to slow descending air motions in the central region of the pressure system, with a characteristic warming of the descending mass of air by compression. If this descending process is long enough, i.e. several kilometres, the mass of air may become considerably warmer and drier than the surrounding air, both above and below it. This kind of thermal inversions are known as subsidence thermal inversions, and frequently cover great extensions, being persistent in time.

Another kind of thermal inversion is due to the arrival of a cold front (frontal thermal inversion), so that the cold air mass arrives at a location with warmer air. That arrival makes the warm air ascend, staying therefore over the coming cold air.
Let's see it!
In this video we can watch how to simulate two opposite situations which can occur at the lowest part of the atmosphere. Firstly, a typical diurnal situation in which air temperature decreases with height. Afterwards, the situation corresponds to a typical night with no clouds, in which the air temperature increases with height, called a temperature inversion.
Typical phenomena associated with radiative temperature inversions are the onset and growth of radiative fog (picture below) and the accumulation of pollutants near the ground.

How to do it?
Material
To carry out this experiment we use:
- 2 methacrylate boxes
- black cardboard
- a couple of carton tubes acting as chimneys
- a few small candles
- small bag of ice cubes
- funnel and tube
- frankincense
- carbon tablets
- matches
Smoke generation
To simulate fog or pollutants close to the Earth’s surface we generate smoke in our experiment. We just light with matches a small carbon tablet, and then put the frankincense on it to get it burned and obtain smoke.
This is how the experimental design looks like
Once the whole experimental design is prepared, it may look like as in the picture. It can be observed that, when we generate smoke and introduce it into the box to simulate the thermal inversion, the smoke accumulates in the bottom part of the box, placed just on the ice cubes (representing the colder air).
Can I do it at home?
The professional way
You can carry out this experiment at home by building your own boxes. Cut the methacrylate sheets and doing a hole on one side to put the smoke inside the box, and a couple of them at another sheet to let the smoke leaving the box through the chimney. Then, you carefully glue all your sheets.

So the whole process is as follows. Once we have the methacrylate sheets for the box faces, we use a drill to do the appropriate holes. Then the faces need to be joint to each other, for example by using silicone, and letting them dry up. You can also add hinges to have a door in the box. Besides, gluing black cardboard on the back box sides may help to have a better contrast when watching the smoke inside, as it is white.
The simple way
You can also use carton boxes. This is an easier and cheaper option, but fully functional.
To prepare them, take a carton box. The back side can be reserved for the part of the box which can be opened, so that you can put inside the candles or ice cubes. Remove one of its sides and instead, cover this part with transparent plastic, so that you can watch what happens inside. Now you only need to make the holes required: one in order to introduce smoke in the box and the other two to put the carton chimneys.
Créditos:
Mariano Sastre Marugán (msastrem@fis.ucm.es)
Javier Blanco Fuentes (javibf@fis.ucm.es)
Encarna Serrano Mendoza (eserrano@fis.ucm.es)
-
Y nuestro más sincero agradecimiento a CarlosRC por su implicación directa en la construcción de las cajas y a Salva por el asesoramiento técnico.
